Injectable Medications in Ocular Care
Optometrists can make use of these treatments using these protocols.
By Brandon Runyon, OD, Blair Lonsberry, OD, and Nathan Lighthizer, OD
Release Date:
March 2017
Expiration Date:
March 15, 2020
Goal Statement:
With the aging population, the need to treat ocular disease—especially more advanced cases that may require the use of injectable medications—will likely be required of many optometrists. Patients need their local eye care provider to be comfortable and familiar with these injections. Because optometrists are just beginning to administer injections as scope of practice expands, there is a general lack of education or training in such injections. The goal of this article is to provide optometrists with a comprehensive overview of the most common injections that optometrists perform, and to improve their clinical knowledge and comfort level when performing clinical procedures around the eye.
Faculty/Editorial Board:
Brandon Runyon, OD, Blair Lonsberry, OD, and Nathan Lighthizer, OD
Credit Statement:
This course is COPE approved for 2 hours of CE credit. Course ID is 52618-IS. Check with your local state licensing board to see if this counts toward your CE requirement for relicensure.
Disclosure Statement:
Authors: Dr. Runyon has no relationships to disclose. Dr. Lonsberry is a consultant for and receives an honoraria from Alcon, Optovue and Shire Pharmaceuticals. Dr. Lighthizer is a consultant for and receives an honoraria from Alcon, Aerie Pharmaceuticals, Diopsys, Optovue and Shire Pharmaceuticals.
Peer Reviewers: Nothing to disclose.
Editorial staff: Jack Persico, Rebecca Hepp, William Kekevian, Michael Riviello and Michael Iannucci all have no relationships to disclose.
“You’re going to put a needle where? You are the glasses and contacts doctor, not the injections doctor.” In the words of football coach Lee Corso, “Not so fast, my friend.” With scope of practice expanding in many states, it may be only a matter of time before injections are a regular part of an optometrist’s daily grind. Naturally, optometrists are curious about them.
This article reviews the four most common injections currently performed in eye care: subcutaneous/intradermal, intravenous, sub-conjunctival and intramuscular (IM) injections.
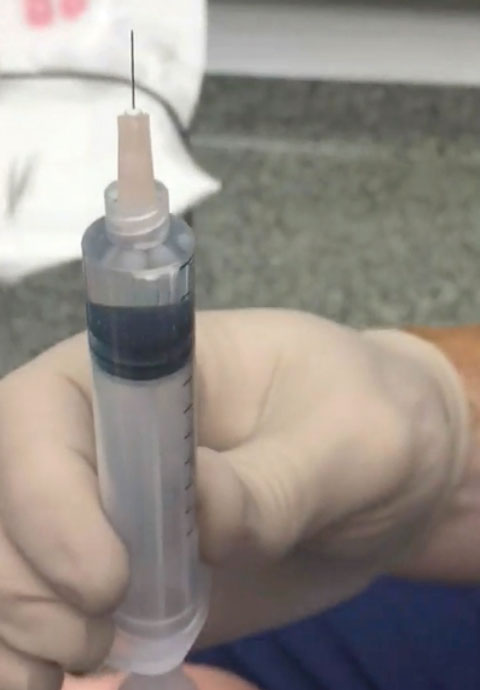 |
| This 10cc syringe is filled with 1% lidocaine with epinephrine and uses a 30g half-inch needle for intradermal injection. |
Subcutaneous/Intradermal Injections
Clinically speaking, the most common injection that optometrists are performing is a subcutaneous or intradermal injection. Anesthetics are the primary class of medications used in eye care, injected via intradermal or subcutaneous routes.1-2 These medications include local anesthetics used prior to in-office procedures—for instance, benign lump removal.
The two most common local anesthetics used in eye care are Xylocaine (lidocaine, Astra Zeneca) and Marcaine (bupivacaine, Pfizer).1-4 For lidodaine, the concentration used around the ocular adnexa is usually 0.5%, 1.0% or 2.0%.1-4 Never inject 4.0% lidocaine, because the higher concentration increases the risk of anesthetic-related complications. Lidocaine has an onset of action in 30 seconds to one minute, with a duration of around 30 to 60 minutes.1-4 Lidocaine with epinephrine, i.e., 0.5mL of 1% lidocaine with epinephrine 1:100,000, lasts about twice as long due to the vasoconstrictive effects of the epinephrine. The lidocaine and epinephrine come in a combination and often don’t require mixing. The maximum allowable dose of lidocaine for an adult is 30mL.5 This is one reason why local anesthesia with lidocaine is so safe. An entire lid can be anesthetized with less than 1mL in most cases. Even if multiple areas require numbing—for example, in the case of a multiple papilloma removal—it would be unusual to exceed 2mL, so the maximum toxic dose should never be approached.
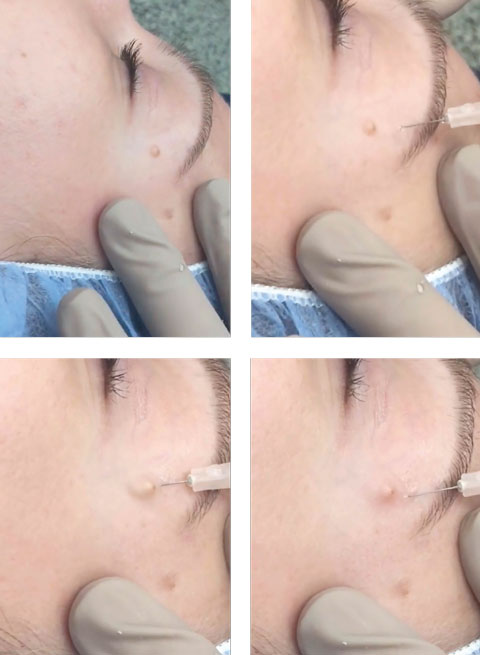 |
| Top left, keep the skin taut immediately before and during the injection. Top right, note the approximately 10- to 20-degree angle of the 30g needle above the skin plane. Bottom left, as the doctor performs the intradermal injection, note the bolus of anesthetic underneath the lesion. Bottom right, the anesthetic is placed underneath the lesion. Always inject as the needle is being withdrawn. Click image to enlarge. |
Contraindications
Avoid anesthetic use in patients who have contaminated wounds—i.e., any wound you did not create yourself under sterile conditions. Additionally, avoid anesthetic use in patients with peripheral vascular disease, cerebrovascular or cardiovascular disease, immunocompromising diseases or nerve blocks. When contraindications do not exist, most practitioners will reach for lidocaine with epinephrine. It is advantageous to use when working on the eyelid and face due to the area’s extensive vascularization. It will often make the job easier during lesion removal, as there will be less bleeding, less swelling and the duration of the anesthesia effect will be increased.
If, however, epinephrine is contraindicated, use lidocaine without epinephrine. Contraindications of epinephrine include angle-closure glaucoma and pregnancy or labor.4,5 It can diminish vascular flow, so if a patient has peripheral vascular disease, that could further reduce the already reduced blood flow. Never use epinephrine in contaminated wounds because it decreases blood flow, which decreases the wound’s natural defenses, potentially increasing the risk of infection. Lidocaine without epinephrine used in eye care is usually in a concentration of 1.0% or 2.0%.4,5
Bupivacaine, most often found in 0.25% concentration, has a slower onset, but is a longer lasting anesthetic agent than lidocaine. It may require approximately five minutes to take effect, but it usually lasts around twice as long as lidocaine.5,6 It is also possible to mix with lidocaine, getting the dual benefit of the quick-acting lidocaine and the longer-lasting bupivacaine. They are often combined in a 50/50 mixture. Research shows no significant difference in onset and duration of action when comparing 0.25% bupivacaine by itself vs. when used in combination with 1% lidocaine.5 However, addition of epinephrine can shorten the onset and significantly increase the duration of action when used with either anesthetic or with the mixture of the two, which is still similar to the onset and duration of action for lidocaine with epinephrine, indicating that lidocaine with epinephrine should be the go-to anesthetic combination when possible.6
Defining Injection Types |
| • Subcutaneous – Any injection below the dermis in the subcutaneous space. • Intradermal – Any injection into the dermal space (which is below the epidermis). Two points of clarification when differentiating subcutaneous and intradermal injections: • Since there is no defined subcutaneous tissue plane in the eyelids, injections into the eyelid are placed in the dermal plane, hence, they are most correctly referred to as intradermal. • A defined subcutaneous plane appears again beyond the rim of the orbit in the skin of the face enabling the administration of true subcutaneous injections. |
Pros and Cons
Advantages of local anesthetic injections include ease of administration, the ability to put the medication directly where it is needed and the ability to control the quantity. Local anesthetic injections are safe and reliable for in-office use. They are more reliable than topical anesthetic creams or gels, which often need 30 to 45 minutes to activate and may not give a full anesthetic effect.5,7 In addition, their inclusion of epinephrine gives them vasoconstrictor capabilities.5 This will provide some amount of hemostasis, which will help minimize bleeding, bruising or swelling.
Disadvantages of local anesthetic injections include discomfort or pain during the injection, especially in the eyelid or face due to the density of free nerve endings in the tissue. Patients can exhibit a certain “fear reaction” with the thought of a needle and injection around the eye. Most often patients will describe a small needle stick or “bee sting” when the needle penetrates through the epidermis and will feel the most pain or burn as the anesthetic is injected. Once the anesthetic takes effect, the discomfort is largely over. The anatomy can be distorted from the injected anesthetic, which can make it more difficult to visualize the tissue in its normal state for lump and bump removal. However, since we often inject very small amounts of local anesthesia, often 0.3cc to 0.5cc, tissue distortion is minimal.
Other risks of local anesthesia include allergic reaction, infection, bleeding from needle trauma, ischemic damage to the tissue if epinephrine is used and systemic absorption, eliciting rare side effects such as tremor, tinnitus, visual disturbance, mental status change, seizure and circumoral numbness.
Most anesthetics are either esters or amides. Esters, such as procaine, novocaine and tetracaine, are particularly notorious allergy-inducing agents.8,9 The topical anesthetic drops that we use in eye care are esters, which are especially effective in numbing mucous membranes, but often are avoided in injections because they are known allergens, whereas allergies to amide compounds, such as lidocaine and bupivacaine, are much less common.8,9 Usually, when an allergic reaction occurs to an amide anesthetic, it is due to preservatives in the solution, such as methylparaben, which is used in a wide selection of anesthetics.8,9 Of particular importance, there is no cross reactivity between the amide and ester class anesthetics. Your patient who had an allergic reaction to an ester-based anesthetic (novocaine) at the dentist may have no issues when numbing the papilloma with an amide-based anesthetic (lidocaine).8,9
Other contraindications include any history of cardiovascular reactions, including hypotension, bradycardia, arrhythmia and respiratory depression from prior anesthetics.8,9
Patient Comfort
Local anesthetics are weak bases; however, to prolong shelf life, they are prepared in acidic solutions. Consequently, it stings when injected. The pH is usually between four and five in the bottle. At that pH, there are two species of lidocaine molecules: one is the charged or polar molecule, and the other is the uncharged or nonpolar molecule. There is a predominance of the charged molecule: about 10 times as much charged/polar lidocaine ion as uncharged/nonpolar lidocaine. Of particular importance, it is the uncharged/nonpolar lidocaine molecule that is able to cross the neuronal membrane, block the sodium channels and precipitate the anesthesia. So when injecting anesthetic out of the bottle, we are injecting an acidic solution with 10 times as much inactive charged/polar anesthetic as the active uncharged/nonpolar form. During the injection, the tissue’s natural buffers have to alter that from a pH of four to five to a pH of 7.4. As that occurs, more of the active, nonpolar molecule becomes available to provide the anesthesia.
If the pH is raised before the injection, it alters the ratio of inactive to active anesthetic. If the pH is raised up to 7.4, it decreases the ratio from 10/1 to 4/1. Now there would only be four times as much nonactive anesthetic compared with active anesthetic. The injection should sting less because more active anesthetic is being injected at a more neutral pH, while at the same time not having to wait for the tissue’s natural buffers to increase the pH. Preparing a solution of nine parts anesthetic to one part sodium bicarbonate before injection will accomplish this by raising the pH of the injectable anesthetic, which puts more anesthetic in the active, unpolar form, which, in turn, will more quickly numb the pain of the injection.
Subcutaneous/Intradermal Injections Protocol
- Wear protective gloves, maintain asepsis and take appropriate needle stick precautions throughout the procedure.
- Clean the top of the medication vial with an alcohol prep pad.
- Draw up medication with the 18g needle by injecting into the vial an amount of air that is equal to or slightly larger than the amount of medication desired.
- Withdraw the plunger to a level that is slightly more than the desired amount of medication. The medication vial should be either horizontal or inverted to minimize air in the syringe.
- Remove the 18g needle and place it in the sharps box. Replace the needle with the finer 27g or 30g needle.
- Invert the needle and push inward on the plunger to remove any air bubbles. You may additionally need to tap the syringe with your fingers.
- Clean the injection site with an alcohol prep pad and allow it to air dry.
- Keeping the skin taut at the injection site, pierce the skin with the needle with the bevel of the needle up. The angle of the needle as it enters the skin should be approximately 15 degrees to 30 degrees above the skin plane.
- Once the needle is under the skin, pass the needle through the skin to the area requiring the injection.
- Before injecting, pull back on the plunger to ensure the needle is not in a blood vessel.
- Inject the medication at a steady rate as you are withdrawing the needle under the lump or bump.
- Withdraw the needle and immediately place the needle and syringe into the sharps container.
IV Protocol
Intravenous (IV) injections are used primarily only for diagnostic purposes in ophthalmic care. Fluorescein angiography (FA) and indocyanine green (ICG) angiography are the two procedures most commonly carried out via IV injection (rarely, a tensilon test will be performed when myasthenia gravis is suspected).10 The obvious benefit of the IV route is the instant absorption of the drug into the vascular system, allowing FA to visualize the integrity of the choroidal/retinal vasculature. However, the main disadvantage is that instant absorption also increases the likelihood of side effects.
The majority of potential side effects in ophthalmic procedures are easily managed; however, potentially life-threatening complications, such as anaphylactic shock, are also possible and require life-saving protocols.11,12 Emergency medical kits contain treatment/management products for a variety of emergency events including anaphylactic shock, vasovagal syncope and other emergency situations. A valid CPR certification should also be held by anyone providing IV injections.
Prior to performing the procedure, have all supplies on hand. This is especially important if performing an FA, as the dye will reach the choroid within 10 seconds, providing the “choroidal flush” phase of the angiography. Two concentrations of fluorescein are available for injection (5cc of 10% or 2cc of 25%). A 23g to 25g butterfly needle infusion set, tourniquet, 3cc to 5cc syringe, alcohol pads, bandages and, to be on the safe side, an emesis basin (or a handy garbage can) should be prepared before the injection.
Find a stable vein in which to inject the dye. Injecting fluid into a vein is more difficult than removing blood, as the blood vessel has to remain stable and not rupture when the fluid is injected. Typically, the veins on the underside of the arm in the antecubital space (median cubital vein, cephalic vein or basilic vein) are used, but if those are not available, then the back of the hand can be used. The blood vessels on the hand often look more prominent and easier to visualize but they are much more unstable and tend to roll and are more likely to rupture when the dye is injected.
Once a vein is identified, a tourniquet is applied above the area that is to be injected (on the biceps if the antecubital veins are to be used or on the forearm if the hand veins are to be used) to increase the blood in the vein, making it more visible. Try to develop a “feel” for the veins by palpating them to determine how stable they are and exactly where they are located. Clean the area with an alcohol pad and let it air dry. The butterfly infusion kit has convenient “wings” to grasp to have more control over the needle. The bevel of the needle is typically bevel up when performing the procedure. Insert the needle into the vein at a 45-degree angle until the needle has penetrated the vein. At this point, you will likely see a “flash” of blood into the tube indicating that the needle is in the vein. The needle is then leveled out parallel to the arm or hand and inserted into the blood vessel and then taped down. Please note that, just because you visualize the “flash” of blood, it does not necessarily mean that you have stable venous access. It is important that the needle is leveled out and inserted into the blood vessel. Once a stable insertion of the needle is achieved, the tourniquet can be removed. Remove the tourniquet prior to pushing the dye or it will potentially increase the chance of rupturing the blood vessel (extravasation).
With the infusion kit stable, the syringe with the fluorescein dye drawn up into it can be attached. The dye push typically occurs over two to six seconds for the entire bolus of dye. Complication rates for rapid vs. a slow dye push have been shown to be similar.13,14 However, a very slow dye administration over 15 to 25 seconds did demonstrate lower complication rates but also made the initial phase of the angiography unrecordable.15 It is crucial to watch for extravasation (blowing) of the blood vessel as the dye is pushed. If the blood vessel blows, then the dye is being injected into the surrounding tissue and not the vein.
The most common complications that a patient can experience after the dye is injected include nausea (most likely complication generally about 30 seconds after the injection), vomiting, pruritus (itch), and urticaria (hives).16 Anaphylaxis, syncope (fainting) and myocardial infarction (heart attack) are also possible but extremely rare and unlikely.2,3 It is important to educate the patient that they are likely to see a yellowing of the skin typically around the injection site, and their urine will be a dark yellowish-orange, both of which are temporary.
After the injection is complete, remove the needle and discard it into a sharps container. Cover the injection site with gauze and a bandage. Remember, it is the responsibility of the person giving the injection to always ensure they know where the tip of the needle is from the time the cap is removed until it is in the sharps container.
Common Subconjunctival Medications and Dosages |
| • Xylocaine (1% lidocaine with or without epinephrine): 0.5mL to 1mL • Kenalog-40 (triamcinolone suspension 40mg/1ml vial): 20mg to 40mg • Ceftriaxone (500mg vial): 100mg • Vancomycin (500mg vial): 25mg |
Subconjunctival Injections
Despite the patient’s natural fear of a “needle coming near my eye,” periocular and intraocular injections have evolved to a level of widespread use in the realm of eye care for a variety of indications. Subconjunctival injections can be among the most useful tools in your procedural toolbox and are effective in creating a depot of medication that is continuously leached onto the ocular surface through the conjunctiva. As with any other procedure in optometry, your first attempt may seem shaky by your own perception, but the keys to success are a calm demeanor, appropriate setup and patient education. If you are performing these procedures less frequently, it does not mean that you’re not capable or qualified. You can always practice subconjunctival injections of sterile saline with a cow or sheep eye, a fellow colleague in your area, or even a willing family member or relative.
One of the skills you need to master to perform subconjunctival injections correctly is creating a dilution. With the exception of lidocaine, most medications will come in a vial in powder form. This allows for adjustment of the dosage based on the indication. Triamcinolone (Kenalog), for example, comes in multiple concentrations, but most commonly can be found in Kenalog-40 formulation, which reads “40mg/1mL” on the bottle. This makes it extremely easy to calculate how much medication to give the patient.
If you want 20mg of medication, inject 1mL of sterile saline into the vial making 40mg/1mL, draw up the entire 1mL of fluid, and then inject only 0.5mL of the solution, which is half or 20mg; (40mg/1 mL) x (0.5 mL) = 20mg.
If you were to inject only 0.5mL into the vial, you need to inject only 0.25mL to achieve the desired dose of 20mg. (40mg/0.5 mL) x (0.25 mL) = 20mg.
Other medications, such as the antibiotics ceftriaxone or vancomycin, commonly come in larger vials in 500mg powder forms, which must be diluted to the appropriate dosage. This can be a rate-limiting step, unless you’ve got an old chemistry textbook handy or you’ve done the calculation ahead of time. The conjunctiva can hold a surprising amount of fluid, but the amount of fluid delivered in a subconjunctival injection should range between 0.25mL and 1.0mL.
Across the literature, there are many indications for subconjunctival injections, and injections are not always reserved for the most severe cases. Most commonly, optometrists think of subconjunctival steroid and antibiotic injections for conditions such as anterior uveitis and infectious corneal ulcers. It might be surprising to know that this type of injection may also be used for treatment of pseudophakic or uveitic cystoid macular edema as well as other conditions such as scleritis, in some situations.17-19 Other indications might include medication noncompliance, patients who are physically unable to instill their own eye drops, a systemic contraindication to oral treatment (such as diabetes), or patients who cannot afford to purchase the needed medications. For example, a 1mL vial of Kenalog-40, which is typically used for anterior or intermediate uveitis, can be obtained online for about $10.
From a patient’s standpoint, there is generally a fair amount of anxiety leading up to the procedure. There are a number of ways to combat this anxiety (including oral anxiolytics), but periocular and intraocular injections are performed multiple times each day in other eye care settings (e.g., retina, hospital clinics) without these medications. When faced with this issue, many times the key to delivering a successful and safe injection lies almost completely in the patient education.
Subconjunctival Injection Materials List |
| • Topical ophthalmic anesthetic (proparacaine, tetracaine) • Topical broad spectrum ophthalmic antibiotic such as fluoroquinolone or PolyTrim (polymyxin B sulfate and trimethoprim ophthalmic solution, Allergan) • Desired injectable medication • Alcohol prep pads • Eyelid speculum • 0.12mm or 0.3mm 1x2 micro-ophthalmic toothed forceps • 2.0cc, 2.5cc or 3.0cc syringe • 18g 1.5” needle for drawing up medication • 25g or 27g 0.5” needle for injection of medication • +/- 4% lidocaine and sterile cotton swab • +/- technician or assistant |
A Patient Presents…
Consider this scenario: A patient with Type II diabetes presents with moderate to severe uveitis in one eye. In the early stages of your discussion with the patient, calmly describe the condition and the significant risks associated with it, such as potential for permanent vision loss, blindness, scarring, recurrence, macular edema, etc. You might say “Mrs. Jones, you have a very significant amount of inflammation present in your eye called iritis. Iritis can result in cataracts, glaucoma, macular edema and other complications that can cause acute vision loss. If not treated appropriately, it can recur and the risks for complications are even higher.”
Maintain a serious demeanor with a relaxed tone throughout the discussion and try to minimize patient questions or other interruptions until you have completed your preliminary education. Next, calmly explain the treatment and why you feel a subconjunctival injection of medication would be extremely helpful. For instance, say “the treatment for this condition requires around-the-clock steroid delivery to the surface of your eye and also keeping the eye dilated for an extended period of time. Given the situation, I think we can best resolve the iritis with the help of an injection of medication under the tissue that covers the white part of your eye. This will ensure that your eye is receiving that around-the-clock steroid.”
At this point, the patient’s usual reaction is fear, but this is the key moment in your conversation when you should sympathize with your patient whether they visibly express fear or not. “I understand that this is probably not what you expected to hear today. Fortunately, as intimidating as this sounds, this is unlike other injections you may have had, and there is relatively little discomfort involved in the procedure. We have a natural instinct to close our eyes when anything is near our eyes, but I have a special device that will help you keep the eye open for the procedure. The tissue that I will inject today will be completely numb, and because I will have you looking away from the area I will be injecting, you will not be able to see it happen. Sometimes people notice a ‘pressure sensation’ as the medication is injected, but there should not be any pain. When the anesthetic wears off, you might later notice some foreign body sensation.”
You can stop now to answer any questions. You have addressed both of the common fears: pain and the fear of “something coming close to my eye.” Answer the questions to the best of your ability and include discussion of any alternatives now that you have explained why an injection is the best mode of treatment for them. If the patient seems receptive, continue into the written informed consent portion of the discussion, which should cover the major risks, benefits, alternatives and complications associated with the procedure. Finally, follow-up with common experiences following the procedure. “Mrs. Jones, I think that you would benefit greatly from this injection, as it continuously releases the needed medication onto the surface of the eye even while you’re sleeping. We could treat this with systemic steroids or topical eye drops alone, but this is less than ideal because treating with topical eye drops alone will take several weeks to completely resolve the signs and symptoms of iritis and the oral steroids can significantly raise your blood sugar.”
However, as with any medical treatment or procedure, there are risks. Many of the major complications—increased eye pressure which may cause glaucoma, accelerated cataract formation, infection and, in rare cases, possible loss of vision—are the same or similar to those associated with simply having iritis. Sometimes a blood vessel might break during the procedure, which may make the eye look slightly red after the procedure, but this will resolve on its own without treatment. Most commonly, people will experience some foreign body sensation from the depot of medication. They may even notice the medication if you look in the mirror and pull your eyelids up or down.
As optometrists, we pride ourselves in good outcomes, being patient advocates and providing the best patient-centered evidence-based care that we can. Subconjunctival injections, when applied in the appropriate situation, can provide an additional treatment modality and dramatically improve outcomes.
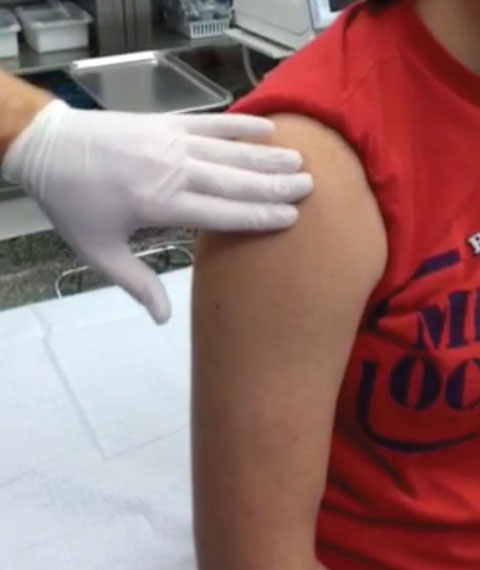 |
| The first step for an intramuscular injection is to select the proper location. |
Subconjunctival Injections Protocol
- Wear protective gloves, maintain asepsis and take appropriate needle stick precautions throughout the procedure.
- Clean the top of the medication vial with an alcohol prep pad.
- Draw up medication with the 18g needle by injecting an amount of air that is equal to or slightly larger than the amount of medication desired.
- Withdraw the plunger to a level that is slightly more than the desired amount of medication. The medication vial should be either horizontal or inverted to minimize air in the syringe.
- Remove the 18g needle and place it in the sharps box. Replace the needle with the finer 27g needle.
- Invert the needle and push inward on the plunger to remove any air bubbles. You may additionally need to tap the syringe with your fingers.
- Select the location by gross observation, which is approximately 5mm (0.5cm) posterior to the limbus and avoids conjunctival vasculature and extraocular muscle insertions to prevent subconjunctival hemorrhage and injection into an extraocular muscle. (Note: typically this is the superior temporal or inferior temporal locations of the globe and posterior enough to cover the subconjunctival medication deposit with the upper or lower eyelid, depending on the location).
- Instill two drops of topical anesthetic into the affected eye.
(Optional: You may additionally soak a sterile cotton swab in 4% lidocaine and hold it to the desired injection site to aid in patient comfort. Never inject 4% lidocaine into any tissue, as it is meant only for topical use.) - Instill one drop of topical broad-spectrum ophthalmic antibiotic eye drop.
- Insert an eyelid speculum to the affected eye by having the patient look down and securing the upper eyelid first. The lower eyelid can be secured next by having the patient look straight ahead or slightly upward.
- Ask the patient to look in the opposite direction of your selected injected site (look superior nasal for inferior temporal location and vice versa).
- Using your non-dominant hand, grasp the conjunctiva at the selected injection site and lift outward, forming a “tent” shape of the conjunctiva with the sterile 1x2 toothed forceps.
(Critical point: Keep a firm grasp on the conjunctiva. Holding tension on the conjunctiva will also help maintain the patient’s gaze in some capacity.) - The injection should be made at an angle parallel to the globe. Gently insert the needle bevel up into the empty space below the “tented” conjunctiva.
- Pierce the “tented” conjunctiva with the needle and inject the medication. Quickly withdraw the needle following completion of the injection. Visualize that the needle has not penetrated the globe. (Note: Tenting of the conjunctiva will form a large pocket of empty space for injecting the medication. This should make it easy to inject the medication and quickly withdraw the needle following completion of the injection, which makes globe perforation unlikely.)
- Instill another drop of a topical broad-spectrum antibiotic eye drop.
- Remove eyelid speculum.
Intramuscular Injection Materials List |
| • Desired medication to be injected • Alcohol prep pads • 1.0cc to 2.0cc syringe • 18g 1.5” needle for drawing up medication • 25g to 27g 1” to 1.5” needle for injection of medication (0.75” for children) • Cotton swab and bandage • 0.9% sterile saline (if needed for creating a solution). |
Muscle Up
Intramuscular injections may be used less commonly than other types of injections in eye care, but they can be great primary treatments as well as effective adjunctive therapy to oral medications. Muscles are highly vascular tissue and larger than subcutaneous tissues, meaning there is more surface area for absorption. This generally leads to quicker absorption and onset of the medication’s effects but can vary greatly between agents. Additionally, the duration of action may be shorter or longer than oral medications, but again this is dependent on the drug.
By far, the most important indication for IM injections is for immediate lifesaving treatment of anaphylaxis in the office. Many physicians’ offices may stock an EpiPen for these rare anaphylactic events, but with the recent significant price hike to more than $500 per EpiPen, many practitioners may be stocking 1mL ampules of 1mg/1mL epinephrine (previously labeled 1:1000) in office due to the significant cost savings (generally less than $5).
IM injections can be particularly useful in other clinical scenarios aside from anaphylaxis as well. For example, per the current CDC treatment guidelines, patients with conjunctivitis secondary to gonorrhea must receive dual therapy with IM ceftriaxone and oral azithromycin or doxycycline.20 From a clinical standpoint, there are other clinical cases where in-office IM injections of anti-emetics, antibiotics, or other medications may be quite useful. For example, a patient who presents with active nausea and vomiting but needs symptomatic relief to complete your evaluation. Other cases to consider involve severe allergic reactions warranting diphenhydramine or epinephrine, more serious soft tissue infections, and select immunizations such as the flu shot.
When giving an IM injection, there are three considerations for the practitioner: medication dosage, location and technique. The medication and amount to be given will largely dictate the location in which you will give the injection, but please remember you will likely have to perform dilution calculations based on how the medication is stored. Some common IM medications and dosages for basic clinical practice are:
- Epinephrine: anaphylaxis; 1mg/1mL; 0.2mg to 0.5mg q5-15m PRN if no clinical improvement.21
- Ketorolac: acute moderate to severe pain; 30mg q6h if >110 pounds.22
- Promethazine: nausea/vomiting; 12.5mg to 25mg q4-6h.23
- Ceftriaxone: gonorrhea infection; 250mg once (plus oral azithromycin or doxycycline).20
- Diphenhydramine: severe allergic reaction; 25mg to 50mg per dose, can give up to 100mg in a single dose.24
With regards to location, the most commonly used injection sites are: upper arm (deltoid), outer thigh (vastus lateralis; site of EpiPen delivery), and the buttocks (ventrogluteal).25,26 Because of the small volume of medication being administered, nearly all of the common medications listed above will be delivered to the deltoid muscle. One to two milliliters of medication is the current recommendation for this location. If you need to administer more than this amount, consider the vastus lateralis, which allows for up to 5mL of medication to be safely administered. If you have a registered nurse nearby (as some hospital-based clinics do), they can be extremely helpful when selecting an injection site or they can even deliver the injection for you.
Current evidence in the nursing literature suggests that the “Z-track” technique should be used for IM injections because it decreases pain on injection and prevents leakage of medication into subcutaneous fat where it may not be absorbed.25 This method involves pulling the skin taut in one direction prior to injection, aspirating, and injecting the medication at 90 degrees over five to 10 seconds. Lastly, withdraw the needle quickly, release the skin, and cover with a cotton swab or bandage. Rubbing the injection site is not recommended with this method.
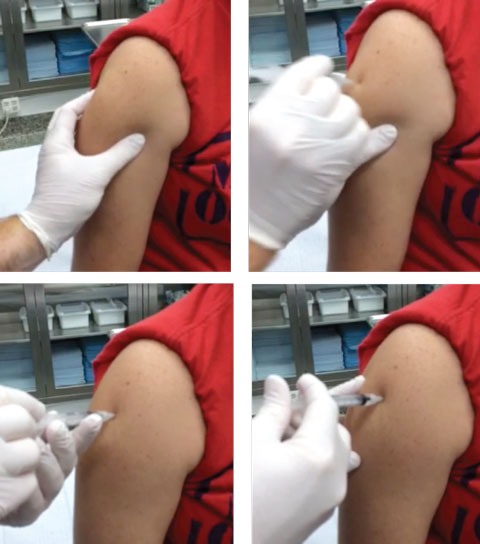 |
| Top left, pinching the muscle can help allow easy access for the medication. Top right, as the needle enters the skin for an IM injection, note how the maneuvering is similar to that of throwing a dart. Bottom left, the doctor pulls back on the plunger just before injection to ensure the needle is not in a blood vessel. Bottom right, the medication is injected at a slow and steady rate. Click image to enlarge. |
Intramuscular Deltoid Injection Protocol
- Wear protective gloves, maintain asepsis and take appropriate needle stick precautions throughout the procedure.
- Clean the top of the medication vial with an alcohol prep pad.
- Draw up medication with the 18g needle by injecting an amount of air equal to or slightly larger than the amount of medication desired.
- Withdraw the plunger to a level that is slightly more than the desired amount of medication. The drug vial should be either horizontal or inverted to minimize air in the syringe.
- Remove the 18g needle and place it in the sharps box. Replace it with the finer 25g or 27g needle.
- Invert the needle and push inward on the plunger to remove any air bubbles. You may additionally need to tap the syringe with your fingers.
- While sitting or standing, have the patient relax their arms at their sides. Find the acromial process (the bony prominence where the humerus meets the shoulder joint).
- Place two fingers across the lateral portion of the humerus in the area immediately below the acromial process.
- The target location for the deltoid injection should be the area just below the bottom finger (about 1” to 1.5” below the bony prominence).
- Clean the injection site with an alcohol prep pad and allow it to air dry.
- Find an area just lateral to the injection site and pull the skin laterally in one direction only with your nondominant hand. Pulling the skin in only one direction will decrease leakage of the medication into subcutaneous fat.
- Pierce the skin at a 90 degree angle with the needle and quickly advance the needle into the muscle. The end of the needle connected to the syringe (the hub of the needle) should come into contact with the skin. This will ensure the needle is deep enough and into the muscle.
- Inject the drug over five to 10 seconds while maintaining the skin taut with your non-dominant hand.
- Remove the needle quickly at a 90 degree angle and release the lateral tension on the skin from your non-dominant hand.
- Immediately cover with a cotton swab and bandage.
Injections are becoming more widespread in optometric practices across the nation. Having the knowledge and skill set to perform injections will expand your therapeutic toolbox for treating patients. But, it will also impress those patients enough to leave the clear impression that, not only are you the “glasses and contacts doctor,” but you’re also a medical professional they can entrust to perform injections.
Dr. Runyon is a staff optometrist at Chinle Hospital Eye Clinic—Indian Health Service in Chinle, Ariz.
Dr. Lonsberry is clinic director of Pacific University’s Vision Clinic in Portland, Ore.
Dr. Lighthizer is assistant dean for clinical care services, director of continuing education, and chief of both the specialty care clinic and the electrodiagnostics clinic at NSU Oklahoma College of Optometry.
| 1. Mendonca F, Reis M, Aguiar J, Calvano L. Systemic lidocaine for perioperative anesthesia: a literature review. J Anest & Inten Care Med. 2015;1(1):555551. Available: www.juniperpublishers.com/jaicm/JAICM.MS.ID.555551.php. Accessed: January 19, 2017. 2. Gills JP, Hustead RF, Sanders DR. Ophthalmic Anesthesia. New York, NY: McGraw-Hill; 1993. 3. Steele E, Ng J, Poissant T, Campbell N. Comparison of injection pain of articaine and lidocaine in eyelid surgery. Ophthalmic Plastic & Reconstructive Surgery. 2009;25(1):13-15. 4. Smith B, Everett W. Physiology and pharmacology of local anesthetic agents. International Ophthalmology Clinics. 1973;13(2):35-60. 5. Zahl K, Jordan A, McCroarty J, et al. Peribulbar anesthesia effect of bicarbonate on mixtures of lidocaine, bupivacaine and hyaluronidase with or without epinephrine. Ophthalmology. 1991;98(2):239-42. 6. Bryant R. Skin anesthesia: lidocaine vs bupivacaine +/- epinephrine. R.E.B.E.L Em. Available: http://rebelem.com/skin-anesthesia-lidocaine-vs-bupivacaine-epinephrine/. Accessed January 19, 2017. 7. Soliman M, Macky T, Samir M. Comparative clinical trial of topical anesthetic agents in cataract surgery: lidocaine 2% gel, bupivacaine 0.5% drops, and benoxinate 0.4% drops. J Cataract Refract Surg. 2004;30(8):1716–20. 8. Covino B. The pharmacology of local anesthetic agents. Br J Anaesth. 1986 Jul;58(7):701-16. 9. Eggleston S, Lush L. Understanding allergic reactions to local anesthetics. Ann Pharmacother. 1996 Jul-Aug;30(7-8):851-7. 10. Fanelli J. Injection: the third method of drug administration. Rev Optom. 2012;149(1):32-40. 11. Balbino M, Silva G, Cardoso G, et al. Anaphylaxis with convulsions following intravenous fluorescein angiography at an outpatient clinic. Einstein (São Paulo). 2012;10(3):374-6. 12. Ha S, Kim D, Sohn C, Lim K. Anaphylaxis caused by intravenous fluorescein: clinical characteristics and review of literature. Internal and Emergency Medicine. 2014;9(3):325-30. 13. Kwiterovich K, Maguire M, Murphy R, et al. Frequency of adverse systemic reactions after fluorescein angiography: results of a prospective study. Ophthalmology. 1991;98(7):1139-42. 14. Chazan B, Balodimos M, Koncz L. Unwanted effects of fluorescein retinal angiography in diabetic patients. Ann Ophthalmol. 1971;3(1):42-9. 15. Behboudi H, Pourhabibi A, Heidarzade A, Haghbin A. Slow versus rapid fluorescein injection in angiographic studies for retinal vascular disorders. Ophthalmic Vis Res. 2009;4(4):228-31. 16. Yannuzzi L, Rohrer K, Tindel L, et al. Fluorescein angiography complication survey. Ophthalmology. 1986;93:611-7. 17. Shorstein N, Liu L, Waxman M, Herrinton L. Comparative effectiveness of three prophylactic strategies to prevent clinical macular edema after phacoemulsification surgery. Ophthalmology. 2015 Dec;122(12):2450-6. 18. Fardeau C, Champion E, Massamba N, LeHoang P. Uveitic macular edema. Eye. 2016;30(10):1277–92. 19. Sohn E, Wang R, Read R, et al. Long-term, multicenter evaluation of subconjunctival injection of triamcinolone for non-necrotizing, noninfectious anterior scleritis. Ophthalmology. 2011 Oct;118(10):1932-7. 20. Centers for Disease Control and Prevention. 2015 Sexually Transmitted Diseases Treatment Guidelines: Gonococcal infections. Available: www.cdc.gov/std/tg2015/gonorrhea.htm. Accessed: January 20, 2017. 21. Lieberman P, Nicklas R, Randolph C, et al. Anaphylaxis—a practice parameter update 2015. Ann Allergy Asthma Immunol. 2015;115(5):341-84. 22. Ketorolac package insert. Lexi-Drugs. Lexicomp. Wolters Kluwer Health, Inc. Riverwoods, IL. Available at: http://online.lexi.com. Accessed Jan 26, 2017 23. Ogston-Tuck S. Intramuscular injection technique: an evidence-based approach. Nurs Stand. 2014 Sep 30;29(4):52-9. 24. Pullen R. Administering medication by the Z-track method. Nursing. 2005 July;35(7):24. 25. Phenergan (promethazine hydrochloride) injection [prescribing information]. Eatontown, NJ:West-Ward Pharmaceuticals: August 2012. 26. Diphenhydramine [package insert]. Lexi-Drugs. Lexicomp. Wolters Kluwer Health, Inc. Riverwoods, IL. Available at: http://online.lexi.com. Accessed Jan 26, 2017. 1. |